Monday, December 16, 2013

STEAMED PERSIMMON PUDDING


A recent find at the local Goodwill.  Two steamed pudding molds.  Other than Boston brown bread, I had not made a steamed pudding before, and now, with the holidays fast approaching,  I gathered up the necessary ingredients, plugged in my Westinghouse roaster, and went to work.


Ingredients
For the Pudding: 
1/2 cup (1 stick/ unsalted butter, softened, plus extra for the pudding mold 
1 cup granulated sugar 
1 cup sifted all-purpose flour 
1 cup persimmon pulp (from 2 to 3 ripe persimmons, peeled and seeded) 
1 tablespoon dark rum 
2 large eggs, slightly beaten 
2 teaspoons baking soda mixed with 2 teaspoons warm water 
1/2 teaspoon vanilla extract 
1/2 teaspoon ground cinnamon 
1 teaspoon ground ginger 
1 teaspoon ground cloves 
1/2 cup chopped walnuts 
1 cup dried figs, diced


To Make the Pudding: 
In a large bowl, cream together the butter and sugar with an electric mixer at medium speed. Add the flour, 1/2 cup at a time, alternating with the persimmon pulp, rum, eggs, and baking soda/warm water mixture. Stir in the vanilla, spices, walnuts, and figs, mix on low until the batter comes together, about 5 minutes. 

Butter the top and bottom of a 2-quart pudding mold with a lid. Spoon in the mixture. Put the buttered lid on tightly and lock into place. Put the mold in a bigger pot filled with water to come halfway up the side of the mold; cover the pot. 

Note: It is necessary to have a well-buttered mold and enough water for ample steam for the pudding to cook correctly. 

Bring the water to a simmer and let simmer over low to medium-low heat for about 2 hours. Make sure the water doesn't evaporate; add more hot water if it does. The pudding should be checked with a cake tester once it's been steaming for 1 1/2 hours. When the tester comes out clean, the pudding is done. Take the mold out of the water, remove lid, and unmold when cool, about 45 minutes to 1 hour. 

While the pudding is steaming, prepare the hard sauce. 

To Make the Hard Sauce: 
Cream the butter and sugar together with an electric mixer. Beat in the brandy. Chill at least 1 hour. Serve with the warm pudding. 

Pudding is best served warm, but may also be served at room temperature. If desired, garnish pudding with confectioners' sugar. Slice pudding and serve with hard sauce. 


Saturday, September 28, 2013

PICKLED GREEN TOMATOES

The growing season in Maine is roughly 90 days. A heavy frost is due soon.  The tomato plants are still loaded with fruit. What to do?

Make tomato pickles!

Though larger tomatoes may be used, I prefer the cherry tomatoes for this gastronomic project.

Choose only green tomatoes. No hint of yellow or red. Remove the stems and give the tomatoes a good washing.

Now, we have two ways of going about this. The first is rather quick and simple. The second method is also simple but requires a little more time.

Method #1:

Clean canning jars

White vinegar

Kosher or canning salt

Pickling spices

Green tomatoes

Pack the jars with the washed tomatoes then fill the jars with vinegar. Pour the vinegar out of the jars and into a nonreactive pot. Keep the tomatoes in the jars.

Add the picking spices to the vinegar, I use about a scant tablespoon per pint, now add about a half cup more vinegar.

Bring the vinegar too a boil, remove from heat and let cool.

When cool, pour back into jars with tomatoes. Cover and store in a cool, dry spot. These will be ready in about a week.

Method #2:

This is a lactofermentation method. The same as making saurkraut.

You will need:

A crock or nonreactive container large enough to hold all the tomatoes.

Distilled water

Kosher or canning salt

Pickling spices

Green tomatoes

Fill the crock with tomatoes, cover with water and then pour out the water into a nonreactive pot. Add 1 cup of salt for every 2 quarts of water. Add spices, bring to a boil and remove from heat. Stir to desolve salt. Let cool. Pour into crock with tomatoes.

If you have an airlock, the can be purchased at a beer or wine brewing shop, us it or seal the crock and "burp" it each day.

In a week to twelve days you should have some nice pickles.

Saturday, September 7, 2013

BREAD PUDDING

I can not remember where I had read a recipe about hollowing out an orange and filling it with a custard. I was making french toast the other morning, had some custard left over and a slice of bread. Grabbed an orange out if the fruit basket, trimmed off the top and scooped out the insides.

Filled it with my bread pudding mixture and baked it in a hot oven for about 25 minutes. 

I thought it came out beautifully. Nice portion size and the orange rind added both a nice flavor and an easy clean up.

Tuesday, September 3, 2013

EGGPLANT CASSEROLE for 20

Last minute menu change. A guest, who was gluten and dairy free, was not going to be happy with a traditional lasagna. So, I put my thinking cap on and did a little last minute shopping.

Standing in the produce aisle It would have been impossible not to notice the pile of bright, purple eggplants. And the price was right. I grabbed an arm full, really, and then picked up a few summer squash and zucchini.

I had a vague idea of what I was going to do, and was making a mental note of what I had back at the schooner, a partial container of pasta sauce, and a few wedges of gluten free corn bread.

After lunch was served I began construction of the casserole. First step was to cut the squash into chunks, and saute them in olive oil. I also diced up 3 onions and added those, along with a tablespoon of oregano.

The eggplant was cut into 1/2 discs, brushed with olive oil, and grilled on the center of the stove. When a nice char developed I flipped them and repeated the process with the remaining pieces.

The eggplant was taking the place of the pasta, and the squash was the filling, I needed a binder.

I pulled out the container of pasta sauce, no meat, and added 10 raw eggs, mixed it up and poured it into the squash mixture, off heat.

In my large lasagna pan I placed a layer of eggplant, then some filling and repeated two more times.

The cornbread was crumbled,  little olive oil was added, and some oregano, then it was spread over the top.

Baked at 400° till the top was golden brown and the center registered 170°

Cool a little before serving.

Sunday, August 25, 2013

PEPPERS PIEDMONTES

The tomatoes are ripening fast and finding ways to use them is always fun.
Piedmont peppers are a marvelous way to use the abundance of both red peppers and tomatoes.

Few things could be as easy.  Slice peppers in half and remove seeds and white membrane. Peel tomatoes by letting soak in very hot water for just a few seconds. The skins should just pull off.

Place one anchovy fillet in the bottom of each pepper and then fill with tomatoes. Drizzle with olive oil and bake in a hot oven till soft and a little charred.  Enjoy.

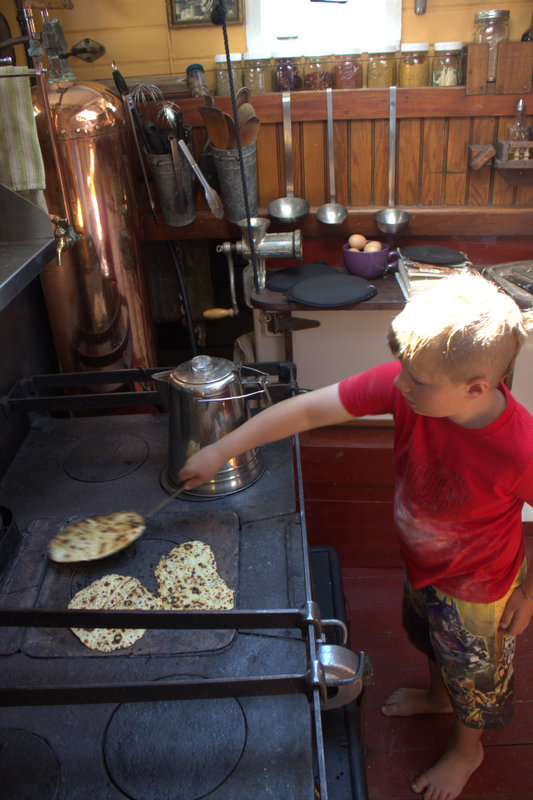
ONION FLAT BREAD, with help from Emmett


1 tsp yeast

1 cup warm water
2 tablespoons sugar
2 tablespoons yogurt
1 medium onion,grated (peeled, of course)
1 egg
1 tsp salt
2 1/2 cups flour
1/4 cup melted butter


MIx all ingredients together in a large bowl, stir well and then let sit 20 minutes. turn out onto a well floured board and kneed for 5 minutes, return to well oiled bowl and let rise till doubled in bulk.

Punch down dough and then divided into eight pieces. roll into balls and let rest 10 minutes.

Roll out as thin as the onions will let you, let rest again for 10 minutes. Get a cast iron pan good and hot. Or use your grill.

Place rolled out dough into hot pan. cook till it begins to brown and then flip.

Charred bits are just fine. These freeze well and can be reheated in a flash.

   ROLLING OUT THE DOUGH


FIRST SIDE


FLIPED AND COOKING OTHER SIDE, NOTE LITTLE CHARRED SPOTS. THIS IS GOOD!

                                                          ROLLING OUT MORE


                                                                     AND MORE


EMMETT WORKING AT THE STOVE

READY TO EAT

BLUEBERRY CAKE


I can not remember a time when we did not have this.  It was often asked for as a birthday cake and as a dessert at lobster and clam bakes.

If you do not have Maine blueberries, those small wild grown gems, then make something else.  If using frozen,Maine berries then do not thaw them before adding.

  • 2 eggs, separated 
  • 1 cup sugar 
  • ¼ teaspoon salt 
  • ½ cup unsalted butter, room temp
  • 1 teaspoon vanilla 
  • 1½ cups sifted flour 
  • 1 teaspoon baking powder 
  • 1/3 cup buttermilk
  • 1½ cups fresh blueberries
Preheat oven to 350°F.

Beat egg whites until stiff. Add about ¼ cup of the sugar to keep them stiff.

Cream butter and remaining sugar remaining sugar, add salt and vanilla and unbeaten egg yolks, beat until light and creamy. Add sifted dry ingredients alternately with the milk. Fold in beaten whites, Your hands will be the best tool for this make sure they are clean.. Fold in the fresh blueberries. (Take a bit of the flour called for in recipe and gently shake berries in it so they won’t settle.)

Turn into a greased 8-by-8-inch pan. Sprinkle top of batter lightly with granulated sugar. Bake for 50 to 60 minutes.
Serves 8.

JANSEN'S TEMPTATION


BEFORE GOING INTO THE OVEN (Alas, I was not quick enough to snap a picture when it came out)

This is my version of the classic Swedish potato dish, Jansen's Temptation.  I made this for the first time on the schooner last week.  Always a little apprehensive about bringing out a new recipe.  What a relief when I saw guest going back for seconds and thirds.

The true Swedish recipe would call for pickled sprats, not always easy to find here, I follow the more English variation but go one step further and add canned salmon.  If you use canned milk rather than cream, and keep potatoes in your larder, this is a dish that you can have on hand should you get snow bound or just not feel like going shopping.


4 large russet potatoes, sliced paper thin

2 sweet onions, sliced paper thin

2 cans Anchovies

1 can Pink Salmon (drained)

1/2 stick unsalted butter

1 cup heavy cream (or evaporated milk)

fresh ground black pepper


Mash the salmon and anchovies together, along with the oil from the anchovies.

preheat oven to 400 degrees

Butter a cassarole dish and layer the bottom with 1/3 of the potatoes.  Layer  the onions and then half of the fish mixture, then another layer of potatoes now add the remaining fish mixture and top with remaining potatoes.  Give a liberal grinding of black pepper and then top with pats of butter and pour 1/3 of the cream/milk over the top.

Bake covered for 20 minutes, add half of the remaining cream, reduce heat to 250 degrees and cook, uncovered for 20 minutes, add remaining cream and bake till potatoes and onions are tender.

Let cool 15 minutes before serving.

Great with a big salad and a vinegary dressing.


Saturday, August 24, 2013

DEVILED EGGS

DEVILED EGGS

A classic and always popular.  Start off by cooking your eggs correctly. Avoid aluminium pots.  Place eggs in a large enough pot so that they can all be in one layer on the bottom with room to move around. Cover with water and add 1/4 cup of salt. Place on high heat, stir now and then, gently!. This helps center the yolks.

Bring to a boil, cover and remove from heat.  Let sit for 9 minutes.  Drain and then cover eggs with ice cold water.  Let chill and then peel

Cut in half, lenght-wise, with a sharp knife, wiping the blade after each use, this keeps the yolks from making a mess on the whites.

Put the egg yolks in a small bowl and arrange the whites, cut side up, on a serving platter.  If a hand full of spring mix or other lettuce is under the yolks it will help keep them in place. Slippery little buggers.

Now comes the creative part.  A little mayo or good mustard is added, just enough to moisten the yolks some but they still want some body.  I Place this into a plastic storage bag, with a small hole cut in the end, and pipe the yolks back into the whites.

Small cucumbers are sliced and added, as are capers and what have you. Deviled eggs are a great excuse to be creative.

CHEESE BREAD

Sailing late into the evenings this time of year. An attempt to get all the sun we can before fall arrives and the days become shorter.
Midday lobster baked become the norm and this allows for a simple, but satisfying evening meal of a good soup, a salad and fresh bread.
Tomato bisque is on the menu this evening and what better to have with it than cheese bread.
4 cups all-purpose flour

1 tablespoon double-acting baking powder

1 teaspoon salt 

3/4 teaspoon baking soda

2 cups sharp,cheddar cheese, grated

2 cups buttermilk


Into a large bowl sift together the flour, the baking powder, the salt, and the baking soda, toss in the cheese and mix well

. Add buttermilk, stir the mixture until it forms a dough. Turn the dough out onto a well-floured surface, work the dough gently by folding and flattening but no more than seven times, treat this as if it were bisguit dough!

. Halve the dough, shape each half into a round loaf, and transfer the loaves baking sheet that has been dusted with corn meal 

. Cut an X 1/4 inch deep across the tops of the loaves with a sharp knife and bake the loaves in the middle of a preheated 350°F. oven for 45 to 55 minutes, or until a tester comes out clean. Transfer the loaves to racks and let them cool

Saturday, August 17, 2013

SPANISH RICE


This was a family favorite growing up.  We could expect to see it a few days after a ham dinner, followed a few days later by a pea soup.  If you do not have leftover ham, then use kielbasa or chorizo.

I am sure that my Mother pulled this out of some magazine some time in the mid 60's.  I would say it was one of the more "Exotic" meals at our table.

2 cups cooked ham, cubed

1 large onion, peeled and diced

1 green pepper, cored and diced

1 red pepper, cored and diced

3 celery stalks, diced

1 tablespoon sweet paprika

1 teaspoon red pepper flakes

2 cans diced tomato

1 cup chicken stock

2 cups white rice

2 tablespoons olive oil

salt to taste


In a heavy bottomed pot saute onion.peppers and celery, along with the paprika and pepper flakes, till soft. Add tomato and chicken stock,  bring to a boil. Add rice and ham, give one quick stir, bring back to a boil and then reduce to a simmer and cook till rice is done to your liking. A real treat is the crusty bits that get stuck to the bottom of the pot.  

P.S. My sister Lois just sent me a message reminding me that Mom would, on occasion, add green olives.


Tuesday, August 13, 2013

ONION TARTS


These sweet and savory onion tarts are wonderful any time of day. With an egg for breakfast, or perhaps a bloodymary. As a lunch with a cold beer or a glass of wine and as a light dinner along with a nice crisp salad.

The dough used here is very easy to work with, rich in olive oil and very forgiving. It has the consistency of play dough and is almost as fun to work with and it certainly tastes better. Once you have handled this, I am sure you will start thinking of other wonderful things that can be made with it.

 Planning a party, busy schedule? Make both the dough and saute the onions the day before and bring all to room temperature before proceeding or you can even finish the whole tart the day before and the reheat.

I use either Vadallia onions or red onions and then slice them thin as thin into half circles.  Sauteed in olive oil till well caramelised.

What you will need:

1 teaspoon active dry yeast
1 tablespoon sugar
2/3 cup warm water
5 tablespoons butter
1/2 cup extra-virgin olive oil.
2 large eggs, beaten
Pinch of salt
4 cups all-purpose flour

Place dry ingredients in a large mixing bowl. Add water,  egg and oil. Mix until a soft dough ball forms. Turn out onto a well floured board and knead just till smooth and pliable. Add a little flour if it feels sticky.

Place in oiled bowl, cover with plastic wrap, and chill in fridge for 30 minutes or over night.
While the dough is chilling it is time to cut and cook those onions, unless you have already done that, then you can relax for a bit.

5 large onions, peeled and sliced or diced, your call.
1/4 cup honey
1 tablespoon sweet paprika
Olive oil for sauteing

In a heavy bottomed pot or frying pan, saute onions till well caramelized. Add honey and paprika and cook 2 more minutes.
Set aside and let cool.
Now, pull the dough out of the fridge and either roll it out onto a sheet pan or press it onto a baking pan.
Bake in a hot oven till almost done and just a hint of colour, now spread the onions over the top and bake till done, about 15 minutes.
Serve warm or room temperature.

Monday, August 12, 2013

FRENCH ONION SOUP

It
THE START OF A WONDERFUL FRENCH ONION SOUP


This soup takes time. No short cuts to a perfect French onion soup. The onions are peeled and cut. I avoid the awkward mess of trying to eat a spoon full of onion rings by cutting them the onions in half and then making a partial cut down the center before slicing. Basically  quartering the onion.

Into a pot with plenty of butter and a bouquet Garni of bay leaf and thyme plua a few grating of Nutmeg. then allowed to cook down over medium?low heat for hours.  Most recipes call for sugar but I feel enough onions are in this recipe and that given time they will caramelize well on their own, again it is all about time.

Remember the beef stock that you made a few weeks ago and put in the freezer? This is what you made it for. Did not get around to making your own stock? Buy a good quality brand, I prefer the cartons to the cans.


4 Tablesppons (1/2 stick)unsalted butter

10 cups thinly sliced sweet onions (about 3-1/2 pounds)

1/2 teaspoon salt

2 bay leaves

bunch of thyme

A few gratings of Nutmeg

1 1/2 tablespoon flour

10 cups beef stock,home made or good quality store bough

1/4 cup Cognac

1 1/2 cup dry white wine

8 (1/2-inch) thick slices of French bread, toasted

3/4 pounds coarsely grated Gruyere

Directions
Melt butter in a heavy bottomed soup pot, stir in the onions add nutmeg,bay and thyme, cover, and cook slowly until tender and translucent, about 10 minutes, increase the heat to medium high, and let the onions brown, This takes time!  Keep an eye on them so as they do not burn.  Your going for nut brown here.

Sprinkle the flour and cook slowly, stirring, for another 3 to 4 minutes. Remove from heat,  whisk in 3 cups of hot stock. When well blended, bring to the simmer, adding the rest of the stock, Cognac, and wine. Cover with a piece of waxed paper with a hole cut in the center, and simmer very slowly 1 1/2 hours, Peek in know and then and add a little water if needed. Taste for seasoning

Now, I do not have a broiler, or a large enough oven to place  place 30 bowls of hot soup, and when we are sailing along in a good breeze it would just become a nightmare of a mess.  To solve this, I place the bread slices on a baking sheet, add the cheese on top and toast these. Come serving time I just ladle the hot soup into bowls and place a slice of toasted cheese bread on top.


Saturday, July 13, 2013

PETITS PAN AU CHOCOLAT

Before turning in for the evening I whipped up a batch if brioche dough.  In the morning the dough was rolled out, and cut into small rectangles.  Chocolate nibs were placed in the center and then the dough is folded over and sealed
Allowed to proof and then given an egg wash before being placed in the oven

Served with both fresh strawberry and raspberry jam and coffee.

Friday, July 12, 2013

PICKLED MACKEREL

This is as simple as can be. Caught a few mackerel the other morning, and after cleaning them I let them soak in a mild brine solution for 24 hours. This helps firm them up.
The pickle was made by adding a few tablespoons of sugar to white vinegar, along with whole cloves and allspice
Red onions are sliced thinly and beets if you wish. They do so add a beautiful colour.
The vinegar is brought to a boil and then allowed to cool.
Pack the fish into clean jars. Add a layer of onion, beets and s bay leaf.
Pour the cool vinegar over the fish, cover and store in icebox.
Though good the next day they are even better about four days after being pickled.
Serve with good rye bread and sour cream or horse radish.

PEANUT BUTTER COOKIES.

Always a big hit when these come on deck after lunch dishes are done.

1 cup butter
1 teaspoon vanilla
2 cups sugar
3 tablespoons molasass
2 eggs
1 cup peanut butter
3 cups flour
1/8 teaspoon salt
2 teaspoons baking soda

Cream butter and sugar. Add molasses eggs and vanilla mix well then mix in peanut butter.

Add remaining ingredients, mix. Shape into 1 inch balls and make cross hatches with fork tines.

Bake 350° for 8 to 10 minutes.

Perfect with a cup of Bowditch coffee or a cold glass of milk.

Wednesday, July 10, 2013

CORN CHOWDER

One should always have a few cans of corn in the larder, or frozen, plus some evaporated milk, onion, potatoes and, of course, some salt pork.

The pork is cut into dice and rendered till crisp. I leave them in the pot and add the diced onion to it. Brown the onions and then add the potatoes, corn and a few bayleaves. Water to just cover. Simmer till potatoes are tender. Add milk and heat.

Serve with hot Bisquits and bread and butter pickles.

Sunday, July 7, 2013

SUMMER IS HERE

With warmer weather our thoughts turn to grilling, fireworks, hot dogs and beer.

At a recent lobster bake I decided to make hot dog rolls from scratch.

I wanted a simple recipe that could be made in a flash. Just flour, yeast, salt and little sugar and some olive oil was all.

I made two dozen rustic rolls and it was a big hit at the bake.

Here it is:

10 cups all-purpose flour
3 packages dry yeast
2 Tablespoons salt
4 Tablespoons sugar
4 Tablespoons olive oil
4 cups hot water (120-130 degrees f)

Place half the flour in a mixing bowl, along with salt and yeast, mix it up. Add hot water and beat till smooth. Add remaining flour, mix and then knead for about 5 minutes.

Place in oiled bowl, let rise till doubled in bulk. Punch down, shape into 5 inch tubes about 1 inch in diameter, place side by each in a baking pan. Let rise till double again.

Bake in a 400 degree oven till done.

Saturday, June 29, 2013

FRESH BREAD


The smell of fresh bread fills the galley, and works it's way on deck. I can here guest commenting on how wonderful the aroma is.  It is a true pleasure for many on board to enjoy a slice of real bread, with or with out a slather of butter.

I was fortunate last week to have the help of my Nephew, Emmett.  I know your thinking, how sweet that you let him pretend to help, you would be very wrong.  Not only am I as demanding of Emmett as I am of any help in the galley, but he also will not be patronized.  Emmett had his hands in the whole process, from start to finish.  It started with him cleaning his finger nails, an achievement that any Mother will appreciate.

We had started the day before by making a starter. Just a simple mix of flour, water and a small amount of yeast.  We placed it in a mason jar, covered the top with cheese cloth, and set it above the copper water tank for the night.  The next day we examined it. I explained to Emmett what we were looking for and how it should smell.


Emmett and I started at 0430. The actual working time for making bread is relatively short, but in order for bread to develop texture and flavour, the resting and rising period can not be rushed.  The flour,water and starter are measured and combined. Then the process of kneading begins. Emmett and I took turns pushing,turning and kneading.  We would cover the dough with the mixing bowl now and then, this gives it time to rest and relax and gives Emmett and I time to play a game of "NINES"

After the kneading is finished we place the dough into a bowl, cover it with a damp linen towel and place it above the water tank.

                                                   THE COPPER WATER TANK


                                                      THE KNEADING BEGINS


                                                                            FOLD


BREAD MAKING IS SERIOUS BUSSINESS


                                                               FIRST RISE


IN THE COUCHE


THE RECIPE


Starter Ingredients

3/4 tsp active dry yeast(1/3 envelope)
1/3 cup warm water
1/3 cup bread or all-purpose flour

The day before baking; mix the starter ingredients, dissolving the yeast in the water first. You want a thick paste when you add the flour. Cover bowl with a clean piece of cloth and let sit at room temperature for 8 to 12 hour or 24 hours in the icebox.

Dough Ingredients

4-1/2 tsp active dry yeast
1-1/2 cups warm water
1/2 batch starter
1 Tbsp salt
4 to 5 cups bread or all-purpose flour

Instructions:

Dissolve yeast in 3 tablespoons of water in a large mixing bowl. When the mixture is foamy (5 to 10 minutes)add the remaining water, and the 1/2 batch of starter.

Mix well with your fingers or a wooden spoon. Stir in salt and flour, 1 cup at a time. You want to get a dough that is stiff enough to knead but not dry.

Turn dough onto a lightly floured work surface and knead until smooth and elastic 20 minutes , adding flour as necessary. The dough should be pliable and not sticky.

Transfer to a lightly oiled bowl, cover and let rise in a warm, draft-free spot until it doubles in bulk, about 45 minutes. Punch down, let rise again. When doubled in bulk, punch down and form loaves

To form the loaves, divide the dough in 4 pieces. Roll out each to form a 18-inch long tube, place formed dough into a bakers cloth. or a floured linen towel to rise.  when doubled in bulk transfer,carefully, to a baking sheet that has been dusted with corn meal.  Make slashes along the top and place in a hot oven.

I cook on a huge cast iron stove, so I am able to toss in a cup of water and create steam.  You can imitate this by placing a pan in the bottom of your oven and filling it with stones, These will get very hot and help generate the steam needed for a crusty loaf of bread.


Tuesday, June 25, 2013

AMERICAN BREAKFAST

Some mornings, after eating oatmeal, bran muffins and various other "healthy"foods, you just want eggs and meat

Wednesday, June 19, 2013

GINGER COOKIES

x
The morning is when my ovens are free. So, long before anyone is even thinking about getting up, I am mixing and rolling out cookie dough.

I roll these into 1 inch balls before coating them with sugar. You can certainly make them bigger. Perfect with coffee or better yet s cold glass of milk.

3/4 cups sweet butter
1 cup light brown sugar, packed
1 large egg
1/4 cup molasses
Zest of 1 orange
1/4 tsp salt
2 1/4 cups all-purpose flour
2 tsp baking soda
1/2 tsp allspice
1 tsp cinnamon
1 tsp ginger
Sugar for rolling

Preheat oven to 350f
In a large bowl, cream butter and brown sugar, add egg and molasses.
Mix in remaining ingredients.

Shape into 1 inch balls. Roll in sugar to coat. Place on ungreased baking pan.

Bake 10 minutes; cool on wire rack

Tuesday, June 18, 2013

MACKEREL ESCABECHE

Just caught off the Schooner Nathaniel Bowditch. Mackerel season is here!

Making a quick escabeche. Results later.

Monday, June 17, 2013

BOOTHBAY TRIP

Working on the menu for our first six day sail of the season. Lobster everyday!

POTATO GNOCCHI


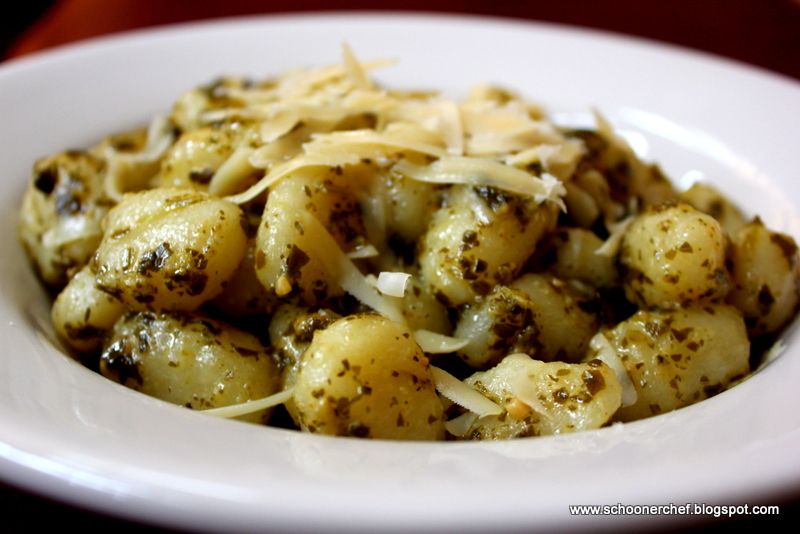
Basil will be planted soon, and that gets me thinking of pesto, and that gets me thinking of potato gnocchi.
Gnocchi take a little bit of practice, but it is well worth the time and effort.  The key is to treat it like pie or bisquit dough and handle it gently.  This will help produce a tender pillow of pasta that begs to be dressed in just enough sauce so as not to mask it.  Pesto is great and so is just a little browned butter and toasted sage leaves.

I have searched through cook books and online, have read that it must be russet potatoes or that it must never be russet potatoes and that you should only use Yukon gold.  I decided to try using both and found that a combination of 3/4 russet to 1/4 Yukon gold works well.  Only have russet or Yukon? No problem.

Boil or Bake?  The goal is to have a dryish mass of potato. I find the russets are best baked in their jackets and then when they come out of the oven cut them in half. lengthwise, then give them a little squeeze to help release steam.  The Yukon's, being a wax potato, do not mind being boiled but do keep the skins on and when the water comes to a boil reduce to a simmer. This will help keep them from splitting.

Once the potatoes are cool enough to handle the skins are removed and the potato is passed through a ricer or a food mill. Don't have a ricer or food mill? Then mash them, but be gentle. And consider getting a ricer or food mill!

Now the flour and salt are added.  At first it will feel as though the potato and flour are never going to mix.  fear not.  I use a fork to mix, trying not to mash it, more of a fold in motion. The idea is to not build up the gluten in the flour, think pie dough here.

Use as little flour as possible, adding just enough to keep the dough from being tacky. I can not stress enough the importance of keeping a light hand in working the dough.  This is a good time to check the dough.
Pull off a little piece and drop it into boiling salted water. After it has come to the surface let it cook for another 15 seconds, then fish it out and taste it.  Worst case scenario is that the gnocchi will fall apart in the water.  This will give you the chance to add a little more flour to the remaining dough.

Now the dough is divided into fourths, and each ball of dough is rolled out into ropes, about the thickness of your thumb, and then each rope is cut into half inch or so lengths, traditionally the next step is to roll the little balls over the tines or a gnocchi board. If you have a gnocchi board but do not have a ricer I would be very surprised.  The little groves are made to give more surface area for the sauce to cling to. Don't have the time or patience for this step? no worries.

The gnocchi are now ready for cooking, or they can be covered loosley and left to sit for a few hours, or you can put them on a tray, freeze them, and then place them in a freezer bag for latter use. Do not thaw before cooking.

How ever you choose to handle them, when you go to boil them, place just a handfull into the water. When they come to the surface let them cook for another 15 seconds and then remove to a warm platter and coat with a little of what ever sauce you are using. Keep warm while cooking remaining gnocchi.


Saturday, June 15, 2013

EARLY IN THE MORNING.

The galley stove has been up and running since 0400. First pot of coffee being made. It is quiet and peaceful.

We have been in port for the past week. Captain Owen and the deck crew have been working on countless projects. Cathie and I spent a few long days getting the garden in some sort of order. Planted 24 tomato plants, transplanted the raspberries and hacked away at the jungle of weeds.

Coffee is ready. I will sit for a moment and enjoy a bit of solitude before the crew and guests awake.

Blueberry pancakes for breakfast.

Sunday, June 9, 2013

RHUBARB PIE

RHUBARB PIE


Rhubarb, as we all know,is a vegetable that is treated like a fruit.
 It has gone by a number of names including pie plant.
 The rhubard season is winding down, time to harvest, cut and freeze.

In keeping with my no strawberries with rhubarb rule here is my pie recipe:

  1. Preheat oven to 450 degrees F (230 degrees C).
  2. Combine sugar, flour . Sprinkle 1/4 of it over pastry in pie plate. Heap rhubarb over this mixture. Sprinkle with remaining sugar and flour. Dot with small pieces of butter and nutmeg. Cover with top crust.
  3. Place pie on lowest rack in oven. Bake for 15 minutes. Reduce oven temperature to 350 degrees F (175 degrees C), and continue baking for 40 to 45 minutes. Serve warm or cold.