Saturday, June 29, 2013

FRESH BREAD


The smell of fresh bread fills the galley, and works it's way on deck. I can here guest commenting on how wonderful the aroma is.  It is a true pleasure for many on board to enjoy a slice of real bread, with or with out a slather of butter.

I was fortunate last week to have the help of my Nephew, Emmett.  I know your thinking, how sweet that you let him pretend to help, you would be very wrong.  Not only am I as demanding of Emmett as I am of any help in the galley, but he also will not be patronized.  Emmett had his hands in the whole process, from start to finish.  It started with him cleaning his finger nails, an achievement that any Mother will appreciate.

We had started the day before by making a starter. Just a simple mix of flour, water and a small amount of yeast.  We placed it in a mason jar, covered the top with cheese cloth, and set it above the copper water tank for the night.  The next day we examined it. I explained to Emmett what we were looking for and how it should smell.


Emmett and I started at 0430. The actual working time for making bread is relatively short, but in order for bread to develop texture and flavour, the resting and rising period can not be rushed.  The flour,water and starter are measured and combined. Then the process of kneading begins. Emmett and I took turns pushing,turning and kneading.  We would cover the dough with the mixing bowl now and then, this gives it time to rest and relax and gives Emmett and I time to play a game of "NINES"

After the kneading is finished we place the dough into a bowl, cover it with a damp linen towel and place it above the water tank.

                                                   THE COPPER WATER TANK


                                                      THE KNEADING BEGINS


                                                                            FOLD


BREAD MAKING IS SERIOUS BUSSINESS


                                                               FIRST RISE


IN THE COUCHE


THE RECIPE


Starter Ingredients

3/4 tsp active dry yeast(1/3 envelope)
1/3 cup warm water
1/3 cup bread or all-purpose flour

The day before baking; mix the starter ingredients, dissolving the yeast in the water first. You want a thick paste when you add the flour. Cover bowl with a clean piece of cloth and let sit at room temperature for 8 to 12 hour or 24 hours in the icebox.

Dough Ingredients

4-1/2 tsp active dry yeast
1-1/2 cups warm water
1/2 batch starter
1 Tbsp salt
4 to 5 cups bread or all-purpose flour

Instructions:

Dissolve yeast in 3 tablespoons of water in a large mixing bowl. When the mixture is foamy (5 to 10 minutes)add the remaining water, and the 1/2 batch of starter.

Mix well with your fingers or a wooden spoon. Stir in salt and flour, 1 cup at a time. You want to get a dough that is stiff enough to knead but not dry.

Turn dough onto a lightly floured work surface and knead until smooth and elastic 20 minutes , adding flour as necessary. The dough should be pliable and not sticky.

Transfer to a lightly oiled bowl, cover and let rise in a warm, draft-free spot until it doubles in bulk, about 45 minutes. Punch down, let rise again. When doubled in bulk, punch down and form loaves

To form the loaves, divide the dough in 4 pieces. Roll out each to form a 18-inch long tube, place formed dough into a bakers cloth. or a floured linen towel to rise.  when doubled in bulk transfer,carefully, to a baking sheet that has been dusted with corn meal.  Make slashes along the top and place in a hot oven.

I cook on a huge cast iron stove, so I am able to toss in a cup of water and create steam.  You can imitate this by placing a pan in the bottom of your oven and filling it with stones, These will get very hot and help generate the steam needed for a crusty loaf of bread.


Tuesday, June 25, 2013

AMERICAN BREAKFAST

Some mornings, after eating oatmeal, bran muffins and various other "healthy"foods, you just want eggs and meat

Wednesday, June 19, 2013

GINGER COOKIES

x
The morning is when my ovens are free. So, long before anyone is even thinking about getting up, I am mixing and rolling out cookie dough.

I roll these into 1 inch balls before coating them with sugar. You can certainly make them bigger. Perfect with coffee or better yet s cold glass of milk.

3/4 cups sweet butter
1 cup light brown sugar, packed
1 large egg
1/4 cup molasses
Zest of 1 orange
1/4 tsp salt
2 1/4 cups all-purpose flour
2 tsp baking soda
1/2 tsp allspice
1 tsp cinnamon
1 tsp ginger
Sugar for rolling

Preheat oven to 350f
In a large bowl, cream butter and brown sugar, add egg and molasses.
Mix in remaining ingredients.

Shape into 1 inch balls. Roll in sugar to coat. Place on ungreased baking pan.

Bake 10 minutes; cool on wire rack

Tuesday, June 18, 2013

MACKEREL ESCABECHE

Just caught off the Schooner Nathaniel Bowditch. Mackerel season is here!

Making a quick escabeche. Results later.

Monday, June 17, 2013

BOOTHBAY TRIP

Working on the menu for our first six day sail of the season. Lobster everyday!

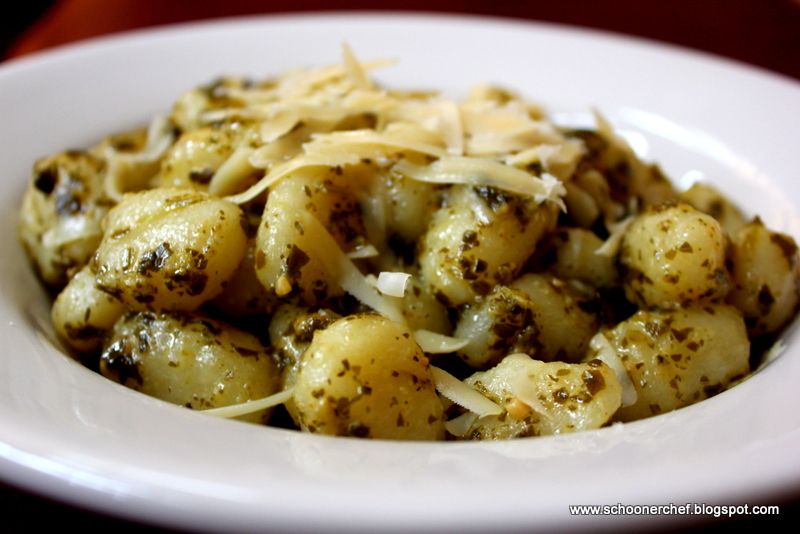
POTATO GNOCCHI


Basil will be planted soon, and that gets me thinking of pesto, and that gets me thinking of potato gnocchi.
Gnocchi take a little bit of practice, but it is well worth the time and effort.  The key is to treat it like pie or bisquit dough and handle it gently.  This will help produce a tender pillow of pasta that begs to be dressed in just enough sauce so as not to mask it.  Pesto is great and so is just a little browned butter and toasted sage leaves.

I have searched through cook books and online, have read that it must be russet potatoes or that it must never be russet potatoes and that you should only use Yukon gold.  I decided to try using both and found that a combination of 3/4 russet to 1/4 Yukon gold works well.  Only have russet or Yukon? No problem.

Boil or Bake?  The goal is to have a dryish mass of potato. I find the russets are best baked in their jackets and then when they come out of the oven cut them in half. lengthwise, then give them a little squeeze to help release steam.  The Yukon's, being a wax potato, do not mind being boiled but do keep the skins on and when the water comes to a boil reduce to a simmer. This will help keep them from splitting.

Once the potatoes are cool enough to handle the skins are removed and the potato is passed through a ricer or a food mill. Don't have a ricer or food mill? Then mash them, but be gentle. And consider getting a ricer or food mill!

Now the flour and salt are added.  At first it will feel as though the potato and flour are never going to mix.  fear not.  I use a fork to mix, trying not to mash it, more of a fold in motion. The idea is to not build up the gluten in the flour, think pie dough here.

Use as little flour as possible, adding just enough to keep the dough from being tacky. I can not stress enough the importance of keeping a light hand in working the dough.  This is a good time to check the dough.
Pull off a little piece and drop it into boiling salted water. After it has come to the surface let it cook for another 15 seconds, then fish it out and taste it.  Worst case scenario is that the gnocchi will fall apart in the water.  This will give you the chance to add a little more flour to the remaining dough.

Now the dough is divided into fourths, and each ball of dough is rolled out into ropes, about the thickness of your thumb, and then each rope is cut into half inch or so lengths, traditionally the next step is to roll the little balls over the tines or a gnocchi board. If you have a gnocchi board but do not have a ricer I would be very surprised.  The little groves are made to give more surface area for the sauce to cling to. Don't have the time or patience for this step? no worries.

The gnocchi are now ready for cooking, or they can be covered loosley and left to sit for a few hours, or you can put them on a tray, freeze them, and then place them in a freezer bag for latter use. Do not thaw before cooking.

How ever you choose to handle them, when you go to boil them, place just a handfull into the water. When they come to the surface let them cook for another 15 seconds and then remove to a warm platter and coat with a little of what ever sauce you are using. Keep warm while cooking remaining gnocchi.


Saturday, June 15, 2013

EARLY IN THE MORNING.

The galley stove has been up and running since 0400. First pot of coffee being made. It is quiet and peaceful.

We have been in port for the past week. Captain Owen and the deck crew have been working on countless projects. Cathie and I spent a few long days getting the garden in some sort of order. Planted 24 tomato plants, transplanted the raspberries and hacked away at the jungle of weeds.

Coffee is ready. I will sit for a moment and enjoy a bit of solitude before the crew and guests awake.

Blueberry pancakes for breakfast.

Sunday, June 9, 2013

RHUBARB PIE

RHUBARB PIE


Rhubarb, as we all know,is a vegetable that is treated like a fruit.
 It has gone by a number of names including pie plant.
 The rhubard season is winding down, time to harvest, cut and freeze.

In keeping with my no strawberries with rhubarb rule here is my pie recipe:

  1. Preheat oven to 450 degrees F (230 degrees C).
  2. Combine sugar, flour . Sprinkle 1/4 of it over pastry in pie plate. Heap rhubarb over this mixture. Sprinkle with remaining sugar and flour. Dot with small pieces of butter and nutmeg. Cover with top crust.
  3. Place pie on lowest rack in oven. Bake for 15 minutes. Reduce oven temperature to 350 degrees F (175 degrees C), and continue baking for 40 to 45 minutes. Serve warm or cold.